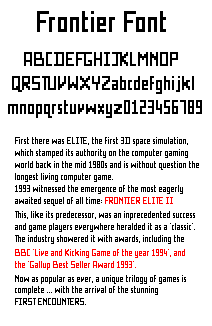
The Frontier typeface was originally used in the classic Frontier: Elite 2 & Frontier: First Encounters games produced by David Braben and Frontier Developments, though an early version of its style can be found in the Elite+ game.
In the summer of 2002 I decided to make a TrueType font based on this typeface which would allow me to utilise the Frontier style in my own websites. When I started the first version of the font I knew very little about font design and so that first version was created out of sheer luck and experimentation.
Not happy with the results, in the Autumn of the same year I embarked on version 2 with the goal of creating an exact replica of the Frontier typeface. Though perfection hasn’t yet been achived it is very close and the grounding is now there for the font to become more exact with each new release.
The .zip archive you will find on this site contains a TrueType Font (TTF) and once installed on your computer can be used to create documents, images or web pages in the Frontier style.
Download
Frontier Font v2.0
Frontier TTF created by Mike Cook 2002
No permission is needed from me for the use of this font, although I would appreciated it if you gave me credit by linking to the Dream-Ware website using the url: www.dream-ware.co.uk
Documentation - Using the Font
Anyone who has played the Frontier games will know just how unique the Frontier typeface is and so in trying to reproduce it as a TrueType Font (TTF) there are inevitably going to be some limitation with its use.
On this page I will try to provide some useful tips on how to gain the best results.
Font Sizes
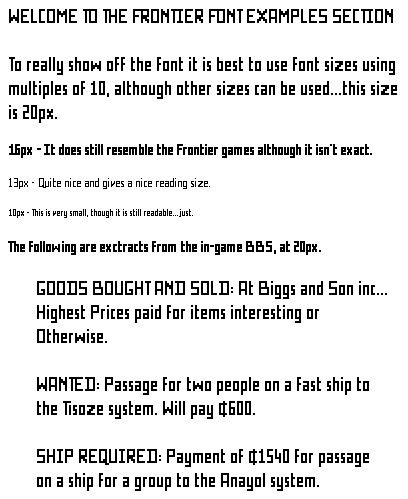
The FE2 and FFE games were designed using a screen resolution of 320x200 and the only font size used was 10px (pixels) or the equivalent 8pt. In designing the Frontier typeface for the modern OS I concentrated on creating pixel exact sizes, so using multiples of 10px the Frontier text is reproduced exactly.
Producing a pixel exact font is all well and true but it wouldn’t be much use if you were limited to just those sizes. With this in mind I spent many weeks on making it look as close to the original style as possible at many different fonts sizes. Currently the font has been optimized at sizes of 9-30, 32, 48px and only multiples of 10px above this (40, 50, 60, etc) have been tested.
Below is a table with the px to pt conversions as well as the ‘web system’ which should help you get the best reults.
| Pixel (px) | Point (pt) | Web | Comments |
| 9 | 7 | 0 | |
| 10 | 8 | 1 | **Frontier exact** |
| 11 | 8 | ||
| 12 | 9 | ||
| 13 | 10 | 2 | |
| 14 | 11 | ||
| 15 | 11 | ||
| 16 | 12 | 3 | |
| 17 | 13 | More Uniform than Web 4 | |
| 18 | 14 | 4 | |
| 19 | 14 | Bolder - better than Web 4 | |
| 20 | 15 | **Frontier exact** | |
| 21 | 16 | ||
| 22 | 17 | ||
| 23 | 17 | More Uniform than Web 5 | |
| 24 | 18 | 5 | |
| 25 | 19 | Bolder - better than Web 5 | |
| 26 | 20 | ||
| 27 | 20 | ||
| 28 | 21 | ||
| 29 | 22 | ||
| 30 | 23 | **Frontier exact** | |
| 32 | 24 | 6 | |
| 34 | 26 | Bolder - better than Web 6 | |
| 40 | 30 | **Frontier exact** | |
| 48 | 36 | 7 | |
| 50 | 38 | **Frontier exact** |
As you can see from the above table the web system is just off from the pixel exact sizes. When creating web pages you may want to consider using the pixel size format to allow more control over how the text looks. Using CSS is a good tool for this.
Bold and Italic
In reproducing the Frontier typeface as exactly as possible I had to sacrifice both the Bold and Italic text styles. The typeface limitations mean that this font may produce unexpected results in their use.
Saying that, at certain sizes, these styles can be used while retaining eligible text and it can even look quite effective.
Hopefully this information will help you achieve the desired results in bringing the Frontier look to the world wide web.

Font Limitations
Using Bold and Italics with this font should only be done with caution.
As there are limitations with this font, reading the Usage Documentation may help you in achieving better results.
I’ve only tested this font on the Microsoft Windows™ OS, though I believe it also works fine on Linux and Apple Mac.
Installation
First, delete any old versions of the Frontier Font from your FONT folder then, after downloading v2.0, install to the FONT folder in your Windows directory.
More detailed instructions for Windows and other OS can be found in the Installation section.
Installing the Font
On this page you will find information on how to install a font to your computer.
If you have any previous versions installed on your system you will need to uninstall them first. Once you have downloaded the font .zip archive, extract to a temporary directory, then:
Microsoft Windows
1. Open the Control Panel (Start -> Settings -> Control Panel)
2. Double-Click on the Fonts icon
3. Click on File -> Install New Font...
4. Browse to where you extracted the .zip archive
5. Select the Frontier (TrueType) file and click OK.
To delete a font follow steps 1 and 2 (Control Panel -> Fonts) select the font file(s) right-click and Delete.
KDE (Unix, Linux, BSD)
1. Open the Control Centre. (K -> Settings -> Control Centre)
2. System Administration.
3. Font Installer.
4. Select 'Add Font' icon from the toolbar.
5. Browse to the location where you unzipped it, and select 'Frontier.ttf'
KDE instructions by Dylan Smith of Alioth.net
Other OS
For all other systems read your documentation on how to install fonts.